This weekend I had FULL intentions on going to a hair braiding shop and getting something done to my head! Usually in the summer I like to get my hair braided in some style that will last and I won't have to do it for a while. Another motivation was from some of my
blog readers that wanted to know how to maintain healthy hair and scalp while wearing extensions. I promise I haven't forgotten about ya!
I washed my hair and started playing around. I rediscovered finger twists! I love these in my hair, but they take a lot of patience. This is the lone reason I don't do them often. One of the many pros to this protective style is that it'll last a couple weeks and will evolve into many styles.
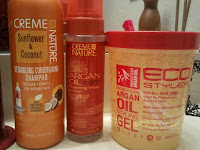 |
Products used: Creme of Nature Detangling Shampoo
Creme of Nature Argan Oil Foaming Wrap Lotion
Eco Styler Argan Oil Styling Gel |
~~~~~~~~~~~~~~~~~~~~~~~~~~~~~~
As requested I'll be giving more detailed steps on how I complete this style, so that it may be tried easier. If you have more questions feel free to shoot em my way! Thanks for that feedback.
~~~~~~~~~~~~~~~~~~~~~~~~~~~~~~
When it comes to selecting hair products it can become very confusing and overwhelming fast! There are SO many products out and they all do a variety of things. There are a few things that I do to help narrow down products, and make it easier for me to choose. The first thing I look at when I pick something off the shelf is its ingredients. It's very important to me that WATER be the #1 (base) ingredient and
not alcohol! Alcohol defeats the purpose of styling, especially when it comes to protective styles. The whole point of a protective style is to protect ^_^
Using a product that has a main ingredient of alcohol can be very drying to your hair. Hair that's dry is prone to breakage and damage (such as split ends) easier. If a product claims to have things in it such as shea butter, argan oil, etc., I look to see how far down the ingredient list that item actually is. If there's 10 ingredients listed, but shea butter is 2nd to last; that means there's very little of it actually in the product. If there's 10 ingredients and shea butter is 3rd or 4th then that item has a good percentage of shea butter in it. Don't be fooled by this!!
******Just for fun--next time you're at the store; pick up a bottle of lotion that claims to be shea butter lotion, or cocoa butter lotion, and check its ingredients. Are you getting your moneys worth, or the most out of the product?
 |
| You can see that water is the #1 ingredient in this wrap lotion. I also checked the "certified organic ingredients" out of curiosity. The organic ingredients in the shampoo are the coconut and sunflower oils. They both smell AMAZING! |
 |
Again, water is the 1st ingredient in the gel. Argan oil isn't where I'd like it to be, but I'll give it a try anyways. BONUS POINTS for having "Love and Pride" as an ingredient!!!!!
~~~~~~~~~~~~~~~~~~~~~~~~~~~~~~ |
For finger twists I don't use many tools or products--I like to keep things neat and simple. The main tool used that's not pictured here is my own fingers!
 |
Tools:
Wide tooth comb- to detangle
Clips- to section off hair
Spray bottle- in case my hair dries faster than I can twist |
~~~~~~~~~~~~~~~~~~~~~~~~~~~~~~
As always, I start off with a freshly washed head of hair that's toweled dried! Next, I detangle, and part my hair into 6 sections using the clips to secure.
 |
| An issue I always run into when doing any type of style that covers my whole head (ex: 2 strands, finger twists) is not keeping the size uniform. I always go from back to front, and as the time goes on, and the closer to the front I get, the bigger the twists/curls get. To help curb this I made the sections toward the front smaller than the 2 in the very back. This way I won't be too tempted to change sizes. |
~~~~~~~~~~~~~~~~~~~~~~~~~~~~~~
One Section at a time:
 |
| Apply a generous amount of foam wrap lotion and finger comb it through. I used about 2-3 pumps per section. |
 |
| After soaking my hair with the foam wrap lotion I clipped the section back up |
~~~~~~~~~~~~~~~~~~~~~~~~~~~~~~
This next part might be a little tricky if you've never done finger curls before. No worries, it's very easy to master! Finger curls are very similar to comb coils. When doing this style on myself it's easier to do finger curls, BUT when I do this on others it's easier for me to do comb coils. Weird--I know! The end result of both is similar. I'll try to take you step by step so that you may recreate this yourself!
~~~~~~~~~~~~~~~~~~~~~~~~~~~~~~
 |
| I always start at the nape of my neck. Take a very small section of hair from the back clipped section. Then, a dab of the eco styler gel on your finger. Coat the hair with the gel concentrating on the roots and ends. |
 |
| Start twirling the strand around your finger. As you do this the gel will be distributed along the length of the hair. You want to start at the roots, pulling taut. As you twirl make your way to the end of the strand. Not using an excess of the gel, make sure the ends are saturated. This will help prevent frizz when the hair dries, and as time goes on. |
 |
| The more taut you have the strand, the tighter the finger curl will be. Once you've twirled it from root to tip, release--finger curl!! Repeat these same steps over again for more curls. |
~~~~~~~~~~~~~~~~~~~~~~~~~~~~~~
After doing a few you'll begin to see what this style will look like!
~~~~~~~~~~~~~~~~~~~~~~~~~~~~~~
Length Check!!
Here I did a random "length check". I always get excited when there's noticeable growth to my hair!! I've definitely come a long way. Straightening my hair isn't something that happens often, but that would probably be more accurate than this method. Back to the curls!
~~~~~~~~~~~~~~~~~~~~~~~~~~~~~~
 |
Left: Shows how I use separate a strand for twisting from the section of hair I'm working with
Right: I use both hands while styling. One hand's busy twisting, while the other's holding hair out of the way |
You don't have to make your curls as small as mine.
I will say this though--the bigger the curls the more chance there will be of them frizzing up and they probably won't last as long as the smaller one. Experiment and see what you like.
A Little More Than Halfway Done:
 |
| When I looked at this in the mirror I noticed some of the curls in the middle are bigger than the others. This is what I wanted to steer away from. I'm not redoing them, but will be aware of it for the rest of the style. |
The back always takes me the longest to do. Once that part is finished the rest is cake! This style took me a while to do, but I was doing other things also. Scrappy (my puggle) got a couple of walks in, I had a snack or three, and a movie or two was watched.
Now, when you get to the last two sections in the very front of your head, this is where you can freestyle the do'. I like to have a part on the left side. To create this with the finger curls I part my hair as if a bang was being made. A part isn't necessary for this style. The curls can all lay going back, going to the left/right. You can be creative with this part.
 |
To part, or not to part? That tis the question...
After I got this far it probably took 20 more minutes to finish. I always take my time on the front, because that's what people will see the most and first!
The front section of my head is the only part I actually needed to use my water bottle. If you twist on dry hair the end result looks different. You're also prone to more frizz from doing these curls on hair that's not damp. |
Finito!! Finally Done!
I LOVE things that are different. Things that you don't see on the shelves in every store are what I'm drawn to. One way I like to accessorize my hair (besides flowers) is to use clip-on earrings!! Yes, clip-on earrings. I don't really go out looking for them though. Most of the ones I own came from my Granny's old costume jewelry collection. Avon sells a lot of necklace-earring sets---Granny has a ton of Avon and I go exploring ^_^ My ears are pierced, so I don't have a real need for the clip-ons. This is my solution! Do you have any creative ways to jazz up your hair, or do you have any variations of this style? Share!!
This is day three of the finger curls!! As the days go on your curls will loosen up a bit.
I haven't been covering my hair at all when I go to sleep. My trick?? A wonderful, soft, satin pillow case! Cotton absorbs moisture, so naturally a cotton pillow case will do just that. It will absorb the moisture from your hair. That's a big no no!
 |
I clipped the earrings over a few curls and secured, so it's easy to take out.
Place a pair close together and it'll look like a single hair piece! |
~~~~~~~~~~~~~~~~~~~~~~~~~~~~~~
I'm going to post updates as I wear this style. These finger curls will be in for as long as I can stand em!! Check back to see the progression ^_~"
*****Note to self: Save blog drafts as you type, in case your phone goes nuts and deletes half of it!*****


