Showing posts with label Heat Damage. Show all posts

Friday, April 6, 2012

March Newsletter


NaturallyMzDezy
In case you haven’t noticed, my blog has been going through some changes as of lately. Slowly, but surely, the site will be getting a facelift. Good news---I own my own domain now! The url: http://mzdezy.blogspot.com will still work, but the new url is: www.naturallymzdezy.com. Thank you for your patience, continued support, and please continue to share.

~~~~~~~~~~

Other ways to connect:

Twitter: Follow me @MzDezy, or tweet using the hashtag #NaturalHair or  #TeamNatural. Every Tuesday, at 7pm join natural hair wearers in some  #CurlChat.

Facebook: Like the group A Natural Hair Affair and share with friends! Whether you have natural hair, are interested in it, or just want to show support---Welcome!! www.facebook.com/anaturalhairaffair

~~~~~~~~~~

Dandruff vs Dry Scalp
To date, I believe this is the most popular post out of the whole blog! I’m assuming many people have concerns about these issues, and/or want to tell the difference. Dandruff and dry scalp are often confused. In most cases the person is just suffering from dry scalp. How do you deal with dry scalp?

Have you ever had dandruff? Share your experiences via Twitter, Facebook, or the blog!

http://www.naturallymzdezy.com/2011/09/dandruff-vs-dry-scalp.html

 ~~~~~~~~~~

Wanted: Hair Inspiration
Need inspiration, ideas, or do you have either to share?? We’d love to know! Share your stories, pictures, advice, etc.

Also, if you have natural hair pictures of styles you’ve created add them to the group Wall, so that they may be added to the Hair I Did album!

~~~~~~~~~~


Most people know Billie Holiday for her singing and her trendsetting hair flowers. Did you know she started wearing these after a BIG hair mishap?
http://www.naturallymzdezy.com/2012/02/hair-oops.html


~~~~~~~~~~


Have you heard of CurlBOX? I first saw it in a holiday magazine article on what to buy your natural friend J So far CurlBOX has surpassed my expectations. Very pleased with the monthly goodies I’ve been getting.

CurlBOX is a monthly hair club for Curly Gurls
Stay tuned for some reviews via Facebook


Questions? Email me!!

Friday, February 10, 2012

Hair Oops!

Have you ever had a hair disaster before?? How did you fix it, or cope with it? While reading about some past and present style icons I came across some info about the great late singer Billie Holiday. Besides a powerful voice, Lady Day was known for wearing gardenia flowers in her hair. This led to a trend that many still follow. I personally can't get enough of hair flowers! Did you know that this was an accidental trend? Yep, it's true! Mrs. Holiday had a section of hair burned off by a curling iron that was too hot!! To mask the area she pinned flowers all over it. This cover-up turned out to be a signature look for her.


Source

~~~~~~~~~~

My hair oops

During my 1st attempt at transitioning I tried to straighten my hair with a straightening comb. Bad BAD idea! The comb was way too hot and literally burned through my hair. Just my luck it happened to be a section at the crown of my head. I was left with a cluster of about 1 inch hairs sticking straight up in the air. Imagine the little hairs on top of tweety birds head, SO embarrassing! There was really no way to cover this up. It took a few months of scalp massages with tea tree oil and heat avoidance to grow the spot out to a workable length. I definitely learned my lesson, and have not repeated it since! I wish I had pictures of it to serve as a warning of what heat damage can do.

~~~~~~~~~~

Post your hair mishaps, oops', trial/errors, etc over on Facebook! I'd love to hear them...if you also have pics, please share!

You can also Tweet me your pics @MzDezy ^_~"

Sunday, December 4, 2011

Video: Warning High Heat!


Warning: High Heat!

How do you protect your hair from heat damage?? Do you have any horror stories? I know I do!! One of the worst things that I've don't to my hair was trying to hot comb it. The comb was way too hot and burned right through my hair. The section was on the crown of my head. so there was no hiding it. About two inches of hair was left. Terrible!! Learned my lesson with that! You can learn more about heat damage H E R E!!

Share your stories on my Facebook Fan Page wall! H E R E!!

Thursday, November 17, 2011

Makeup of Hair

Your hair is made up of a few parts, and is a little complex. Understanding these parts, and their individual functions can be beneficial when it comes to achieving healthy hair, and scalp. It's also very important in growing long, healthy hair, and maintaining the hair you have currently.


The main parts of your head of hair involve your scalp, hair, hair follicle, sebum, and the sebaceous gland.
What exactly are these?

~~~~~~~~~~

Hair: Keratin that's composed of two parts; the shaft (the visible part above the scalp) and the follicle (which can't be seen and is below the surface of the skin).

Keratin: Protein that gives hair its strength. It makes up your hair, nails, and top layer of skin.

Follicle: Is the living part of the hair containing blood capillaries. The follicles shape influences the shape of the cortex, which in turn determines what the hair type will be. Ex. curly, straight, wavy

Shaft: Is made of three layered keratin layers. Ex. cuticle, cortex, medulla

Sebum: A natural oil that's produced by the sebaceous glands. It helps protect the skin and hair from drying out. It's usually odorless unless there's bacteria present.

Sebaceous Gland: Responsible for producing oil that protects the hair and skin.

~~~~~~~~~~


To maintain healthy hair it's very important to protect and nourish all parts of your hair.

Cuticle in Detail
  • The outer most layer of hair
  • Gives hair its sheen
  • Made of tight scaled keratin layers- think roof shingles
  • It's transparent
  • Functions as a protective layer to the hair
  • Part that absorbs conditioners
  • Causes tangles and snags if the layers are lifted or damaged
  • Can't repair itself once damaged


Cortex in Detail
  • The second layer of the hair shaft
  • Makes up the majority of the mass
  • Contains pigmented cells that gives hair its color
  • Helps determine the elasticity of hair
  • Area of the hair that experiences damage from heat and chemicals
  • Holds moisture
Medulla in Detail
  • Center of the hair shaft
  • Isn't continuous throughout the length of hair
  • Thick or coarse hair has a medulla
  • Thin hair usually lacks it
  • Blonde hair doesn't have one
  • It's purpose is unknown
~~~~~~~~~~

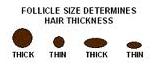
The shape of your hair follicle determines whether your hair will be straight, wavy, or curly. You can have more than one type of hair, or even curl pattern on your head.


The size of your hair follicle determines the thickness.


~~~~~~~~~~

Hair Facts:
  • There's over 100,000 hair follicles on your head
  • Thick curly hair tend to be short, because sebum can't reach the length of the hair shaft causing the hair to be dry and brittle
  • Hair uses the same cells that are responsible for bone growth
  • There's a muscle fiber connected to the sebaceous gland that controls goosebumps and your hair standing up on end.
  • An unbalanced diet can cause brittle and dry hair
  • Hair gets it shine from sebum the scalp produces
  • Made of about 10% water
  • Animal hooves, claws, and feathers are made of the same thing as your hair - keratin
  • Sebaceous glands are found everywhere except on the soles of your feet and the palms of your hands
~~~~~~~~~~

If growth and retention are important to you when it comes to hair you should keep all of this in mind. Once your hair is damaged (sun, heat, chemical, etc) it can't be undone. To correct badly damaged hair your only option is to cut it. You can temporarily repair hair with smoothers, conditioners, sealants, silicones, etc, but they're not permanent solutions. Making sure you care for your hair properly can help prevent unwanted chops.


All Rights Reserved
If you copy this picture please link back to this site and give me credit ^_^" Thanks!

(Above) Blue: Cut mark   Red: conditioners
1. A healthy hair can experience slight damage from normal wear of a day. Chlorine, dyes, heated tools, winter hats, brushing, and hair accessories can all wear on your hair over time. The key is protecting your hair and being aware of its state. If you keep up with necessary trims there will be minimal hair removed.

2. After a while your hair can become frayed, experience heat damage, or break off from over processing. You may notice uneven pieces of hair, fly aways, or split ends. This is when you want to start taking action before it spreads. Unattended split ends can travel up the length of the hair causing more damage. These splits get caught on each other, and this causes tangles which can cause further damage.

3. Conditioners, silicones, and oil treatments, for example, can help temporarily seal split hairs, but it's not permanent. After washing those seals are removed and need replaced. This is why conditioning is important. Once the cuticle of your hair is damaged it can't repair itself. It's up to you to maintain and protect the hair.

4. If your hair is continually neglected, or trims aren't being done as necessary you may end up having to cut more than anticipated in order to correct the damage.

5. You can see the difference between trims. If you address it early you'll retain more length than if you put it off. Hair grows at about 1/4 inch a month so in order to retain some length you don't want to cut more than that. Example: Roughly 1.5 inches can be grown in about 6 months time. If you trim more than that it's like knocking your hair length back 6 months. So your hair may healthier if it was damaged, but you won't see the growth. That's why it's important to stay on top of it!


How often do you trim your hair? What do you do to make sure your hair is healthy?

Follow me on Twitter @MzDezy or like my Facebook Fan Page and let me know!!

Sunday, October 30, 2011

MzDezyB on YouTube!

YouTube is a site that I've learned a lot from--both good and bad. It helped me learn how to do flat two strand twists, reconstruct my own t-shirts, make flax seed gel, that there reallyare people in the world who put bacon on everything, the latest dance moves to avoid at all costs, and more! I had no idea how challenging it could be to make my own video for YouTube!! So far I have two made!!! The first was the most difficult, but I made it. Check them out, subscribe to my channel, let me know what you think, and keep your eye out for more!!

Monday, October 24, 2011

Coconut Oil

My latest venture was making whipped shea butter with coconut oil! I love shea butter, coconut oil, and essential oils, so why not make something great out of all of them? This time around I made sure to take pictures of the process.


What I Used:
~~~~~~~~~~~~~~~~~~~~~~~~~~~~~~

Using a double boiler, on a medium heat I melt the shea butter and coconut oil. About two parts raw unrefined shea butter was used to about one part organic extra virgin coconut oil. It takes a few seconds for it to melt completely. That's fine, because I don't want to cook the oils; I just want them melted.

Once the majority of the shea butter and coconut oil is melted I turn the heat down to low. Using a plastic knife I gently stirred the remaining chunks until melted. After completely melting, I add in Vitamin E Oil, Olive Oil, and Carrot Oil. It looks like popcorn oil.

~~~~~~~~~~~~~~~~~~~~~~~~~~~~~~

Next, it's time to cool the oil down to stop the cooking process, and so that it may be whipped! I put the entire pot into the freezer for about 3 minutes. After removing, I use a hand mixer (on a medium setting) to whip the oils together.


I mixed the oils for about 3 minutes before returning the pot to the freezer. In the beginning you'll notice that the mixture returns to its liquid state. The friction caused by the mixer reheats the oil, so the process of mixing/chilling has to be repeated a few times.

Soon you'll see froth on top of the oils. This is caused by the air forced into the oils by the mixer. You want to see this; it's what will make the whipped product light and fluffy.

~~~~~~~~~~~~~~~~~~~~~~~~~~~~~~

After repeating this process a few times the mixture will start to thicken up.


At this point you want to start paying extra attention to your mixture. Keep blending, but cut the time in the freezer down so you don't over chill the mix. It'll remind you for a watery pancake batter. If you want a more airy product set the blender speed to high. This will force more air into the oils.

~~~~~~~~~~~~~~~~~~~~~~~~~~~~~~

Now is when I add in any EO that I plan on using. For this mixture I used about 6 drops of Lemon EO and about 30 drops of Lavender EO before blending. Smell the whipped mix, and if the scent isn't to your liking adjust the number of drops you use.


When you see a "skin" forming on the top after putting in the freezer you no longer need to chill the mixture. Continue to blend until you reach a consistency that you like. Keep in mind that the mixture will solidify a little more after it completely chills.

~~~~~~~~~~~~~~~~~~~~~~~~~~~~~~

When the shea butter-coconut oil mixture starts to look like a body butter, or thick lotion I stop blending. This is the consistency I desire. If you keep blending the result will be more airy and solid. Stopping here gives you a creamier product. In the end both ways will melt at body temperature.


~~~~~~~~~~~~~~~~~~~~~~~~~~~~~~

Using my plastic knife I scrape in my whipped shea butter into small glass jars with air tight lids. A piping bag (like bakers use) could be used to help transfer the whipped shea butter into containers.


As you can probably tell, the results resemble a lotion. The consistency will vary depending on the air temperature. The amount of coconut oil you use will help determine this. If stored in a cool place it'll remain soft, but solid.

~~~~~~~~~~~~~~~~~~~~~~~~~~~~~~

Pros of this Mix:
  • The acid in Lemon EO will help seal the hairs cuticle trapping in moisture
  • Lemon EO acts as a clarifier to your hair helping to remove excess product and add shine
  • Lavender EO is great for dry, oily, or damaged hair, because it helps normalize natural oil production
  • Both Lemon EO and Lavender EO help fight the causes of dandruff.
  • Coconut oil melts at about 75 degrees, so your natural body temp helps it spread. Less product needed
  • Coconut oil is a natural antimicrobial
  • Shea butter and coconut oil are both great hair and skin conditioners
  • Shea butter has many healing properties
  • Shea butter is quickly absorbed by the skin
  • Carrot oil is high in antioxidants that help fight hair loss
  • Olive oil helps improve elasticity (how far hair can stretch before breaking) of dry hair
  • The whipped mix isn't as thick as raw shea butter, so people who were turned off by that have a new alternative

Uses for this Mix:

There are a few samples of my whipped shea butter mixtures floating around out there. Hopefully soon I'll have a couple reviews back on it. Try to create your own mixes. What would you use??

Thursday, October 13, 2011

Olive Oil Treatment

Hot oil treatments are one of my favorite things to do to my hair and scalp! They can come in handy in the hot summer time, or during the cold, dry winter. Personally I don't do them more than twice a month, if that often. There are a ton of premixed oil treatments at stores, but you can easily make it with things you probably have at home already. Carrier oils that I like to use for treatments are jojoba, carrot, coconut, tea tree, and olive. To enhance these oils even more I like to add vitamin E oil, vitamin A oil, or even a drop or two of an essential oil (EO) such as lavender. Here's a simple recipe:

~~~~~~~~~~~~~~~~~~~~~~~~~~~~~~

Olive Oil Treatment

1/4 Cup Olive Oil (less if hair is short)
1 Tablespoon Honey
3 Drops of your favorite EO (optional)

*** Mix the ingredients together in a bowl, and then add to damp hair. Make sure to concentrate on your ends. Cover your hair and leave on to condition. If you have a heat cap leave the mixture on for 20 minutes. If you're using a regular shower cap leave the mixture on for 40 minutes. Next rinse your hair well, then continue, and style as usual.

~~~~~~~~~~~~~~~~~~~~~~~~~~~~~~


Benefits of Olive Oil:
  • Helps keep the scalp conditioned and moisturized preventing dry scalp and dandruff
  • Contains natural fatty acids and can help minimize frizz, dry, or damaged hair
  • Adds shine that sulfates (found typical shampoos) strip from your hair
  • It's linked to preventing hair loss by stopping production of the hormone DTH
  • It's a natural anti-fungal and antibacterial

Benefits of Honey:
  • Helps seal in moisture, because it's an humectant (holds water)
  • Contains vitamins such as: B1, B2, B6, B5, B3, C
  • Trace amounts of iodine, zinc, and copper are found in it
  • It's a natural anti-fungal and antibacterial
  • Full of antioxidants which help prevent cell damage
** Honey naturally contains trace amounts of hydrogen peroxide, so over time it can lighten your hair. This would depend on how frequent you use honey in your hair, or mixtures.

~~~~~~~~~~~~~~~~~~~~~~~~~~~~~

T I P !!

*** To turn this recipe into a hot oil treatment put the mixture into an empty bottle and let it sit in warm water as you wash your hair. The water will warm the oil before you use it.


~~~~~~~~~~~~~~~~~~~~~~~~~~~~~

 
This hair olive oil hair treatment is great for anyone who has heat damaged hair, chemically damaged hair, dry scalp, dry hair, dull hair, lifeless hair, and anyone who wants healthier hair! Try it out and let me know your thoughts!! Do you have any hair treatments of your own? Share!!

Tuesday, September 13, 2011

Dandruff vs. Dry Scalp

Did you know that there's a difference between having a dry scalp and having dandruff? There is, and other scalp conditions are often mistaken for having dandruff.

Since skin cells are so small, most of the time your skin cells are replaced, or flake off without you noticing. There are a number of things that can cause skin cells to shed more often in large oily patches. These patches are what make a difference between dandruff and dry scalp.

Some Causes of Dandruff:
  • Allergies to hair products, or their ingredients
  • Some medications can have a side effect of dandruff
  • Eczema, psoriasis, and other dermatitis can cause a form of dandruff
  • A fungus called Malassezia
  • Certain illnesses such as Parkinson's disease
  • Having a compromised immune system
Some Causes of Dry Scalp:
  • Washing your hair with hard water can remove needed oils and moisture
  • Being dehydrated or not eating right can effect your oil glands in your scalp
  • Over blow drying, using curling irons, flat irons, and other heated hair tools
  • Over using shampoos, or using ones that contain sulfates (read the ingredients)
  • Over using hair products that have harsh chemicals such as a high alcohol content
  • Simply dry weather

~~~~~~~~~~~~~~~~~~~~~~~~~~~~~~

Dry Scalp


VS.


Dandruff

~~~~~~~~~~~~~~~~~~~~~~~~~~~~~~


What is dandruff??

Dandruff is a mixture of dead skin cells, and sebum (oil) clumped together. It usually has a yellow tint to it and can be flaky. In severe cases there's actual scalp tissue, bacteria, and/or fungus in the mix too.

~~~~~~~~~~~~~~~~~~~~

What is dry scalp??

Dry scalp is dehydrated and/or shedding dead skin cells. It usually is white in color and flaky.


~~~~~~~~~~~~~~~~~~~~~~~~~~~~~~


Need Help with Dry Scalp?
  • Drink plenty of water. It'll help keep your skin (scalp) hydrated.
  • Don't wash your hair daily
  • Minimize the use of heated hair tools, or use cool air to if you must blow dry
  • Use a shampoo that's specialized for dry scalp
  • Try a hot oil treatment of coconut, olive, or caster oil!!!
  • Use essential oils such as: tea tree, rosemary, or peppermint, which all help dry scalp
Need Help with Dandruff?
  • Try a specialized shampoo that's sulfur, tar, or zinc based
  • In extreme cases prescription steroid creams are helpful
  • Use lukewarm water to wash hair so no further damage is done to the scalp
  • Identify allergens and irritants of your skin, then avoid them if possible
  • If all else fails, it may be time to visit a dermatologist
  • Stressed? Try to relax. Stress can cause oil glands to go out of whack. Either producing too much oil (causing pimples) or not producing enough (irritating current conditions)

~~~~~~~~~~~~~~~~~~~~~~~~~~~~~~


I've never had to personally deal with dandruff. Knock on wood that I won't have to. Dry scalp is a different story! My favorite way to deal with dry scalp is to use hot oil treatments!! I have a few concoctions that I pull out, so be on the watch for that!!

Also don't forget to subscribe and/or follow me   ^_~"   You can now subscribe by simply typing your email into the box at the top and hitting submit!!!

Thursday, September 1, 2011

Warning: High Heat

Did you know.... that using a heated hair tool that's too hot can permanently damage your hair after just one use?? Yep, it's true! This damage causes the cuticle to stay straight and not return to its curly state even after many washes.

Did you know.... that your hair can literally boil from heated hair tools if they're not properly used? When this happens the keratin softens and can explode.

Magnified you can see the heat damage--bubbles were caused
Image from: pgbeautygroomingscience.com

~~~~~~~~~~~~~~~~~~~~~~~~~~~~~~

The 1st piece of hair gets the tool when it's at its hottest and in its most damaging state!!
Example of heat damage from a styling tool--courtesy of my cousin
 Did you know.... that different hair types (straight, curly, wavy, and thin, etc.) have temperature limits when it comes to heat?

Do you use the suggested amount of heat? Too much, too little?
Image from: Folica.com

Did you know.... that the smoke you see while blow drying is actually moisture evaporating from your hair! This can cause serious damage that can't be repaired.

Image from: wikipedia.com

~~~~~~~~~~~~~~~~~~~~~~~~~~~~~~


Photos of Heat Damage:


Magnified Split Ends
How to fix--cut them off! If you ignore
them, they can travel up the hair shaft.

THIS is what my patch of hair looked like when I tried to hot comb it!!!
The only difference was that the damaged remains were in the crown of my head. There was NO hiding them!


Healthy hair over length! If you focus on the over all
health; the length will come.

Over processing your hair with chemicals can result in the same damage as putting too much heat on it!


****TIPS****
~~Always flat iron clean and conditioned hair! This can help minimize possible damage.

~~It's best to towel dry your hair as much as possible before blow drying. Blow dry on medium-low heat.

~~Invest in a good flat iron. The money spent is well worth the protection and outcome of your hair!!

~~Always use heating tools that YOU can control the temperature of! Off-On buttons aren't going to cut it.


~~~~~~~~~~~~~~~~~~~~~~~~~~~~~~


Ways to Protect Your Hair:
  • Check to see if the flat iron you bought also has heat protecting products
  • Use the lowest recommended setting to begin
  • Recognize different textures (if any) in your hair. Different sections may need different amounts of heat
  • Never style wet hair!! Make sure your hair is 100% dry
  • Use shampoos/conditioners that assist in straight styles. That way you won't have to apply heat daily
  • Blow dry/flat iron in sections. Smaller sections will need less time under heat vs. a thick section
  • If heat's a must--deep condition weekly to prevent damage
  • When possible--air dry your hair
  • Try heat activated products
  • Follow the directions that actually come with your styling tools

~~~~~~~~~~~~~~~~~~~~~~~~~~~~~~


You shouldn't be afraid of heat, or avoid it completely. With all things, moderation, information, and protection are the key!! At least in theory right ^_^  Me personally, I use a flat iron, and blow drier, but on rare occasions. It only takes one time for damage to be done though! There are ways to help protect your hair against the heat of styling tools.

Heat can also be a positive thing for you hair. When conditioning, the reason it's advised to rinse with lukewarm water, or to wear a warm towel/shower cap, is because of the heat. Heat "opens up" your hair allowing for the conditioner to be absorbed. If the heat source is too hot, yes damage may be done.

Are there any products that you use to help prevent heat damage?

Have you had to deal with damage done by you, or a stylist??

Is there a brand of styling tools you'd recommend???

Comment below!!!