Showing posts with label Argan Oil. Show all posts

Wednesday, November 2, 2011

Quick Style: Wash n Go

Here's one method of how I do a quick, simple wash n go! This took a max of 10 minutes to complete, if that.

Things needed:

Wide tooth comb
Conditioner
Spray bottle
Essential oil (EO) of your choice
Towel (optional)


~~~~~~~~~~
To Make an EO Mix: I use a spray bottle that's easy to control and hold in one hand. Fill it with warm water, then (depending on the size) add about 3 drops of lavender EO, and give it a quick shake.
~~~~~~~~~~

 
I try to never comb my hair while dry, because it rips, tears, and risks damaging it. Detangling almost always takes place while I'm washing my hair, and it's covered in conditioner. Detangling while conditioner is on your hair helps lubricate and protect the strands. Conditioner also smoothes the cuticle making it harder for strands to catch, tangle, or pull while combing.

To begin I soak my entire head (using warm, not hot, water) and rinse until the water runs clear. I do this to make sure any product that may be in is rinsed out. Next, I co wash (cleanse hair/scalp using conditioner instead of shampoo) rinse again, then squeeze (not twist) excess water out. After rinsing I soak my hair in conditioner, making sure all sections are covered evenly.


Soaked in conditioner!!

~~~~~~~~~~

Once the conditioner's in I spray down my entire head very well with the EO mixture. To prevent product build up you want about half of the conditioner to be diluted. When the EO mix is in I massage it around for a few seconds, and then detangle using a wide tooth comb. I start around the edges and ends of my hair, and then work my way closer to the crown and roots. If necessary I hold sections of hair so that strands aren't pulled or ripped out in the process. The wide tooth comb helps in the detangling, and it help define curls without manipulating them too much. If you twist, pull, or rub curly hair while it's wet (or in the drying process) you can cause unwanted frizz. This is why I don't use a towel for wash n go's, but if you choose to be gentle!

Just a little conditioner left after the EO mix spray down and detangling!

~~~~~~~~~~

****This is all done on the side of my tub and/or holding my head upside down (let gravity help you) ****

~~~~~~~~~~

Ignore the brows 0_o I was trying to get them together while doing my hair and I need an outline to help  ^_^"
Notice the definition on my curls!! I love it!

Tadaaa...hair and brows done in about 10 minutes! You can move your hair around to where you'd like it to be when dry. Try not to manipulate it too much so that you may prevent frizz.
~~~~~~~~~~

Pros to Wash n Go's:
  • Low maintenance- to refresh in the mornings just spritz with the EO mix and fluff
  • Moisture (water) gets sealed in your hair by the oils in the EO mix
  • You're helping your hair maintain its flexibility by keeping it moistened and conditioned
  • Time needed for styling is minimal
  • Can be done with cheap/expensive product
  • Conditioner coats the cuticle adding protection to the hair
  • Protein conditioners strengthen hair from the inside out
  • Conditioner help define and give a slight hold to curl patterns in hair without gel
~~~~~~~~~~

Want More Info on Essential Oils? View some of my older posts!!


Want to see another wash n go method?

~~~~~~~~~~

Quick Tips:

***Using the above method you can turn an old twist/braid/knot out into a quick wash n go. This is helpful when you just have to do something to your hair but are short on time!

***Jazz up a wash n go by adding an accessory such as: hair flower, clips, colorful head band, or a fancy scarf.

***If you have different hair/scalp needs experiment with different EO mixes to help. Example: if you have oily hair, or dandruff you may want to try a Rosemary EO mix.

***I don't recommend this style for someone who's transitioning. Unless you have very little relaxed ends remaining it may not look the best if long pieces remain straight.

~~~~~~~~~~

I'd like to thank everyone who submitted an entry for my 1st Giveaway!! All of the entries were VERY good and creative...I loved them! I'll be announcing the winner soon! Be on the look out for more Giveaways.

I also want to welcome, and thank everyone who's joined/liked A Natural Hair Affair on Facebook, have followed my blog, and watched my YouTube videos! I appreciate all of the questions, feedback, emails...everything! I love talking to new people, learning and exchanging info! Keep it coming ^_~"

~~~~~~~~~~

Tuesday, September 27, 2011

Quickie: Stuffed Twisted Updo

I saw this style while surfing YouTube videos last week and decided to try it. The channel I saw the video on was PrettyDimples. You can find a link to her channel under my "Links" tab up top!!


I've been celebrating my birthday, my friend's birthday, and other Virgo's birthdays ALL month! I wanted to do something different with my hair for the last party we would be having. This style was simple enough to do, and didn't require me buying anything for it.


What I Used:
  • Rat-tail comb
  • Hair clips
  • 1 pack of braiding hair
  • Eco Styler Argon Oil Gel (find out more about it H E R E !! )
  • Bobby pins
  • Lighter


I started by washing my hair, adding leave-in conditioner, then blow drying it. A small section on braiding hair was folded in half, and then the fold was heated with the lighter, molded with my fingers to make a point, and then lined up with the beginning of the parted twist. Each twist has a piece of braid hair that I used to stuff the twist. After forming the twist as far as possible incorporating your own hair, keep twisting tightly to make the braid hair roll. You'll start to get the crazy twisted coils. Keep twisting til you're at the end of the braid hair, then secure with a bobby pin.

The finish results were my variation on the how-to video. I prefer bigger twists to smaller ones. Making big twists limited how much hair was left over to twist into the spirals pinned on the side. If you used smaller twists then the spiral section, in the end, will be fuller. Over all I'm happy with this style. I've gotten SO many compliments on it from friends, co workers and even strangers.


The entire style took me about 45 minutes total to do. I always multitask when it comes to doing my hair, so it usually takes me longer than if I just focused on it. The twisted updo is one I'd suggest for someone who's transitioning, wants a protective style, or just something different.

It's day 4 with this style and it's still holding strong. At night I use a satin hair scarf to protect the edges of my hair, and then cover the remaining hair with a satin hair bonnet. I also sleep on a satin pillow case-- if you don't own one, get one!! It'll be one of your hairs best friends  ^_^"

Friday, September 16, 2011

Quickie: Protective Style

Protective styles in the form of extensions were something I loved while my hair was transitioning. It took some of the anxiety I was having off of my shoulders. A simple but cute age appropriate style was OK in my book.


Simple corn rows

It took the stylist about 30 minutes to complete this style for me. With the ends down they reached just below my shoulders.


To switch up this style here are some ideas:

  • Twisted the hanging hair into a bun that was off centered at the nape of my neck
  • Add a hair flower just above my ear
  • Braid the hanging hair into one big braid
  • Make a pony tail that hangs over your shoulder

You can dress this hair style up by:

  • Adding chunk earrings with the hair pulled back
  • Add a big hair accessory, such as a flower
  • Make a pony tail using a decorative scarf
  • Form a head band out of a decorative scarf

To extend the life of this style:
  • At night put hair in loose pony tail, then cover with a satin bonnet or scarf
  • Washing your hair is still possible, just massage shampoo in between the braids, then air dry
  • If your scalp gets dry or itchy massage oil on it before bed
  • Sleep on a satin pillow case if there's no bonnet or scarf available

This protective style could've lasted a good month or more if I wanted it to. I'm particular when it comes to braids in my hair. These were removed after too much fuzzy hair was showing in the braids from me washing, and from normal wear.

To remove I cut a good majority of the hanging hair off. This made it easier for me to undo the braids. If you do this make sure not to go too high, so you don't chop off your own hair!! Afterwards be sure to deep condition your hair before styling again.

Monday, September 5, 2011

Product Quickie

There are so many stores that sell hundreds of products. What's the best store to buy hair products at--I'm not sure. It depends on what you're looking for and your budget. A lot of products I use, or try, I find randomly. I might be at the store for socks, and see there's clearance shelves full of conditioner, and there it is! I'll show you some products that I use, describe them, tell where I found them, and how much.


I've used Eco Styler gel for some time now. Just recently was the variation with Argan Oil was discovered by me. Eco Styler with olive oil was the version that I was familiar with. It was mostly used to smooth down the edges of my hair, for flat twists, and wash n go's. Notice the difference in size of these two containers.

Eco Styler Argan Oil Gel:
  • Bought at Sally's Beauty Supply
  • 32 ounces
  • Cost about $8
  •  Alcohol Free
  • 100% Pure Argan Oil
  • My uses: wash n go's, edge smoother, flat twists
Eco Styler Olive Oil Gel:
  • Bought at Dollar General Store
  • 16 ounces
  • Cost about $5
  • Alcohol Free
  • 100% Pure Olive Oil
  • My uses: wash n go's, edge smoother, flat twists

My favorite way to do wash n go's, and probably the easiest, is to simply use conditioner. If I'm in a hurry, or know that I'll be doing my hair later in the day, I'll use a cheap conditioner. Conditioner is the easiest and quickest way to define my curls after washing/wetting it. I choose a cheap one, because I can afford to use a ton of it at a time. If I pay $15 for conditioner it's not going to be used up in one day--just saying. Suave Naturals is my go to cheap conditioner for quick wash n go's! I like the smell of coconut, so Tropical Coconut is the scent I choose.


Suave Naturals: Tropical Coconut
  • Bought at: Dollar General Store
  • 15 ounces
  • Cost $1
  • Water based
  • Contains honey, rosemary, and coconut extract
  • My uses: wash n go's

Lustrasilk is great for deep conditioning. This helped me a lot while I was transitioning! Your hair feels soft, smells great, and is easily detangled after using this. There are a few different kinds out there, but these are the two that I use the most. I see these often at just about any store I go to that sell hair products. The only difference, like with the Eco Styler, is probably the price. After washing my hair I use a couple of hand fulls of this, and soak my hair, then cover with a shower cap for at least 30 mins before rinsing.


Lustrasilk Tea Tree- liquid cholesterol (blue):
  • Bought at: local hair store
  • 20 ounces
  • Cost: about $5
  • Contains vitamin E, tea tree oil, soybean oil, safflower oil, peanut oil, rosehips extract
  • Great for dry, itchy scalp
  • My uses: deep conditioning, wash n go's
Lustasilk Herbal- cholesterol (orange):
  • Bought at: local hair store
  • 20 ounces
  • Cost: about $5
  • Contains carrot oil, rosemary oil, sage
  • Great for damaged, relaxed, and chemically treated hair
  • My uses: deep conditioning

I try to keep an eye out for clearance bins of random products. When products are super cheap it's a great time to buy and try! Even travel sizes are cool if you're curious about something, but don't want to spend the money on the full bottle. Walmart usually has a clearance isle. I've found tons of hair products, tools, accessories there before. I'll keep you posted if I find a good haul!

Do you have any products to add to the list? Know of any places for hair products? Comment below ^_~"

Don't forget to subscribe! You can now subscribe via email...just type it in the box up in the top left corner and hit "submit".

Tuesday, August 30, 2011

Wash n Go!

I made it to DAY 14 with my finger curls!! The curls probably could've lasted longer, but I was ready for a change. Fourteen days is an extremely long time for me with one style. Sooo wash n go it was! I absolutely love wash n go's!! Lived on them for the longest time and never had an issue. This time I decided to try an Ecostyler Wash n Go. There was still plenty of the Ecostyler Argan Oil Gel left. The huge tub I showed in my previous posting, I bought at Sally's for about $8. You can also find it at dollar stores and other places, but Sally's has the best deal for the quantity you get.

As always I started with a freshly washed head of hair ^_^ Using hair clips, I sectioned my hair, detangled and started in the very back near my neck. I applied the Ecostyler similar to how I did for the finger curls. Once a small amount of gel was applied, I raked my fingers through the hair. While raking you'll see your curls become more defined. I do this for a couple passes then move on.


This is the back of my head and the finished result!!

Pros:
  • You're getting the benefits of the argan oil
  • No damage from alcohol by using the ecostyler brand
  • Style will last a while because of the gel
  • Low maintenance
  • It's a wash n go--you're free to leave now
Cons:
  • It takes a long time to air dry at room temp
  • If you air dry you may have a lot of shrinkage in length

To maintain this style at night I simply sleep on a satin pillow case. I don't cover my hair at night, because I don't want a bonnet or scarf crunching my curls up. In the mornings I use my pink water bottle (shown in previous posting). The only thing different with the water bottle this time is I've added 1 drop of pure Lavender Essential Oil (EO). A few sprays on my hair, fluff here and there, then I'm done!

***Tips***

~A diffuser may be used to dry your curls once the ecostyler's applied. This can save you some length if you're worried about shrinkage from air drying.

~To jazz up the look, clips, flowers, scarves, head bands, etc., may be added.

~You may use a different EO in your water bottle to get different benefits and scents. 1 drop is plenty, and goes a long way for a small bottle like mine.

Do you have other methods for doing wash n go's? Share!! Don't forget to subscribe, and to give some feedback  ^_~"

Monday, August 15, 2011

Finger Curls

This weekend I had FULL intentions on going to a hair braiding shop and getting something done to my head! Usually in the summer I like to get my hair braided in some style that will last and I won't have to do it for a while. Another motivation was from some of my blog readers that wanted to know how to maintain healthy hair and scalp while wearing extensions. I promise I haven't forgotten about ya!

I washed my hair and started playing around. I rediscovered finger twists! I love these in my hair, but they take a lot of patience. This is the lone reason I don't do them often. One of the many pros to this protective style is that it'll last a couple weeks and will evolve into many styles.
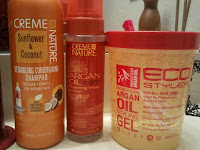

Products used:
Creme of Nature Detangling Shampoo
Creme of Nature Argan Oil Foaming Wrap Lotion
Eco Styler Argan Oil Styling Gel

~~~~~~~~~~~~~~~~~~~~~~~~~~~~~~

As requested I'll be giving more detailed steps on how I complete this style, so that it may be tried easier. If you have more questions feel free to shoot em my way! Thanks for that feedback.

~~~~~~~~~~~~~~~~~~~~~~~~~~~~~~

When it comes to selecting hair products it can become very confusing and overwhelming fast! There are SO many products out and they all do a variety of things. There are a few things that I do to help narrow down products, and make it easier for me to choose. The first thing I look at when I pick something off the shelf is its ingredients. It's very important to me that WATER be the #1 (base) ingredient and not alcohol! Alcohol defeats the purpose of styling, especially when it comes to protective styles. The whole point of a protective style is to protect ^_^

Using a product that has a main ingredient of alcohol can be very drying to your hair. Hair that's dry is prone to breakage and damage (such as split ends) easier. If a product claims to have things in it such as shea butter, argan oil, etc., I look to see how far down the ingredient list that item actually is. If there's 10 ingredients listed, but shea butter is 2nd to last; that means there's very little of it actually in the product. If there's 10 ingredients and shea butter is 3rd or 4th then that item has a good percentage of shea butter in it. Don't be fooled by this!!

******Just for fun--next time you're at the store; pick up a bottle of lotion that claims to be shea butter lotion, or cocoa butter lotion, and check its ingredients. Are you getting your moneys worth, or the most out of the product?


You can see that water is the #1 ingredient in this wrap lotion. I also checked the "certified organic ingredients" out of curiosity. The organic ingredients in the shampoo are the coconut and sunflower oils. They both smell AMAZING!


Again, water is the 1st ingredient in the gel. Argan oil isn't where I'd like it to be, but I'll give it a try anyways. BONUS POINTS for having "Love and Pride" as an ingredient!!!!!

~~~~~~~~~~~~~~~~~~~~~~~~~~~~~~
For finger twists I don't use many tools or products--I like to keep things neat and simple. The main tool used that's not pictured here is my own fingers!

Tools:
Wide tooth comb- to detangle
Clips- to section off hair
Spray bottle- in case my hair dries faster than I can twist

~~~~~~~~~~~~~~~~~~~~~~~~~~~~~~

As always, I start off with a freshly washed head of hair that's toweled dried! Next, I detangle, and part my hair into 6 sections using the clips to secure.


An issue I always run into when doing any type of style that covers my whole head (ex: 2 strands, finger twists) is not keeping the size uniform. I always go from back to front, and as the time goes on, and the closer to the front I get, the bigger the twists/curls get. To help curb this I made the sections toward the front smaller than the 2 in the very back. This way I won't be too tempted to change sizes.
 ~~~~~~~~~~~~~~~~~~~~~~~~~~~~~~

One Section at a time:
Apply a generous amount of foam wrap lotion and finger comb it through. I used about 2-3 pumps per section.

After soaking my hair with the foam wrap lotion I clipped the section back up
~~~~~~~~~~~~~~~~~~~~~~~~~~~~~~
This next part might be a little tricky if you've never done finger curls before. No worries, it's very easy to master! Finger curls are very similar to comb coils. When doing this style on myself it's easier to do finger curls, BUT when I do this on others it's easier for me to do comb coils. Weird--I know! The end result of both is similar. I'll try to take you step by step so that you may recreate this yourself!
~~~~~~~~~~~~~~~~~~~~~~~~~~~~~~

I always start at the nape of my neck. Take a very small section of hair from the back clipped section. Then, a dab of the eco styler gel on your finger. Coat the hair with the gel concentrating on the roots and ends.

Start twirling the strand around your finger. As you do this the gel will be distributed along the length of the hair. You want to start at the roots, pulling taut. As you twirl make your way to the end of the strand. Not using an excess of the gel, make sure the ends are saturated. This will help prevent frizz when the hair dries, and as time goes on.

The more taut you have the strand, the tighter the finger curl will be. Once you've twirled it from root to tip, release--finger curl!! Repeat these same steps over again for more curls.
~~~~~~~~~~~~~~~~~~~~~~~~~~~~~~

After doing a few you'll begin to see what this style will look like!

~~~~~~~~~~~~~~~~~~~~~~~~~~~~~~
Length Check!!
Here I did a random "length check". I always get excited when there's noticeable growth to my hair!! I've definitely come a long way. Straightening my hair isn't something that happens often, but that would probably be more accurate than this method. Back to the curls!
~~~~~~~~~~~~~~~~~~~~~~~~~~~~~~

Left: Shows how I use separate a strand for twisting from the section of hair I'm working with
Right: I use both hands while styling. One hand's busy twisting, while the other's holding hair out of the way


You don't have to make your curls as small as mine.
I will say this though--the bigger the curls the more chance there will be of them frizzing up and they probably won't last as long as the smaller one. Experiment and see what you like.
A Little More Than Halfway Done:

When I looked at this in the mirror I noticed some of the curls in the middle are bigger than the others. This is what I wanted to steer away from. I'm not redoing them, but will be aware of it for the rest of the style.

The back always takes me the longest to do. Once that part is finished the rest is cake! This style took me a while to do, but I was doing other things also. Scrappy (my puggle) got a couple of walks in, I had a snack or three, and a movie or two was watched.
Now, when you get to the last two sections in the very front of your head, this is where you can freestyle the do'. I like to have a part on the left side. To create this with the finger curls I part my hair as if a bang was being made. A part isn't necessary for this style. The curls can all lay going back, going to the left/right. You can be creative with this part.

To part, or not to part? That tis the question...
After I got this far it probably took 20 more minutes to finish. I always take my time on the front, because that's what people will see the most and first!

The front section of my head is the only part I actually needed to use my water bottle. If you twist on dry hair the end result looks different. You're also prone to more frizz from doing these curls on hair that's not damp.

Finito!! Finally Done!


I LOVE things that are different. Things that you don't see on the shelves in every store are what I'm drawn to. One way I like to accessorize my hair (besides flowers) is to use clip-on earrings!! Yes, clip-on earrings. I don't really go out looking for them though. Most of the ones I own came from my Granny's old costume jewelry collection. Avon sells a lot of necklace-earring sets---Granny has a ton of Avon and I go exploring ^_^ My ears are pierced, so I don't have a real need for the clip-ons. This is my solution! Do you have any creative ways to jazz up your hair, or do you have any variations of this style? Share!!


This is day three of the finger curls!! As the days go on your curls will loosen up a bit.

I haven't been covering my hair at all when I go to sleep. My trick?? A wonderful, soft, satin pillow case! Cotton absorbs moisture, so naturally a cotton pillow case will do just that. It will absorb the moisture from your hair. That's a big no no!


I clipped the earrings over a few curls and secured, so it's easy to take out.
Place a pair close together and it'll look like a single hair piece!
~~~~~~~~~~~~~~~~~~~~~~~~~~~~~~
I'm going to post updates as I wear this style. These finger curls will be in for as long as I can stand em!! Check back to see the progression ^_~"
*****Note to self: Save blog drafts as you type, in case your phone goes nuts and deletes half of it!*****

Saturday, May 28, 2011

Dry Conditions

After my last posting I was asked about hair remaining super dry no matter what's tried. I knew exactly what they were talking about. There were times, especially when I was transitioning, that no matter if I dunked my head in water it would be dry! This was very discouraging and frustrating for me. If you have a good stylist who knows about textured hair they can be a great resource to managing your hair.

Weekly visits to the salon can become very costly and time consuming. So, through trial and error I've come up with my own solutions to this problem. Eating right, drinking plenty of water, covering your hair at night, not spending too much time in direct sun, avoiding products with a high alcohol content, using high heat as least as possible--these are a few ways to gain a healthy scalp and head of hair.

Deep conditioning packs!! About $2 each!

Olive oil and argan oil have been to my rescue many a time! I'm not sure if they're hidden secrets or what, but I don't really hear much about either product in general. When I hear oil and hair they don't seem to go together. Greasy hair is the last thing you want if you're goal is to maintain healthy hair. Trying random products out and doing a little research I've learned a thing or two. If you're like I was here's a little info on both:
Argan Oil
  • Comes from the seed of an endangered fruiting tree found in northern Africa that's high in vitamin E and essential fatty acids
  • Can be used in foods, for dry and dull hair, brittle nails, skin problems such as wrinkles, stretch marks, acne and eczema
  • Natural antioxidant, so it helps lock in moisture, repair damaged hair, maintain healthier roots and scalp
Olive Oil
  • Originally from Asia, pitted olives are pressed to retrieve the oil
  • Contains both vitamin E and essential fatty acids, which are vital to healthy skin and hair
  • Can be used in food, treating ear aches, digestion issues (such as constipation and indigestion) and to combat dry skin and hair
~~~~~~~~~~~~~~~~~~~~~~~~~~~~~~~~~~~~~~~~~~~~~~~
As always, I started the process with freshly washed hair and a clean scalp. Since I was planning on straightening my hair I didn't want to add more stress to it than necessary. I used a detangling shampoo with tingling peppermint oil. Smells SO good and your hair/scalp feels really nice after wards!

Next, I used the Olive Oil Replenishing Pak that's in the first picture. After gently towel drying my hair I SOAKED it in this conditioner. There's a lot of product in that little pack, but I used it all. 
 
To make sure the product was distributed evenly I used my shower comb to detangle my hair. With the olive oil conditioner in still, I parted my hair into four braided sections so it would be easier to rinse and keep untangled.
Nothing fancy, just 4 sections

Side note:
In theory, knowing your hair type could help you in knowing how to work with your hair. I honestly have no clue what my hair type it besides a "do what it wants to do" type. 4B, Type 3..sounds like a game of bingo. Might just add this to my research list and get back to ya on it!
If you know hair types maybe you can help me out?
 
After I got done with sectioning my hair I put a shower cap on. The longer you keep it on the better, but I had some things to do so I kept it on for about 20 mins before rinsing. 
 
Tip: If you do a conditioning pack in the evening, and will be in for the night, you can try this. Wash your hair and condition as explained here, but instead of rinsing, keep the shower cap on. Add a bonnet or scarf on top of the shower cap to keep it in place. You can continue with your normal activities; including sleep. Keep the scarf and cap on while you sleep. The shower cap will keep the moisture trapped, so your hair doesn't dry out during the night. The scarf/bonnet will keep the cap from coming off while you sleep. In the morning rinse and continue the steps like usual. This deep conditioning method is great for wash and goes too!
 
Whenever I rinse my hair I use low pressure and lukewarm water. Hot water can strip your hair of its needed oils, and cold..well I just don't like being cold but it helps seal your hairs cuticle. 
 
The braids were left in while rinsing the conditioner out. I squeezed the sections to make sure all of the product was out--rinsed for about 3 minutes. 

Working one section at a time I blow dried my hair, pinned it out the way and moved onto the next. Since the hair was detangled when the conditioner was applied it doesn't need it again. This is a plus to rinsing with the sections in tact. After my whole head's dried I took small sections out of a pony tail to begin flat ironing.
Helps split ends and breakage that can occur from styling

A little Healing Serum was applied to the sections before flat ironing, focusing on the ends. The ends of hair tend to be the driest, most vulnerable to heat, everyday wear and prone to breakage. This product adds shine, and a protective layer to seal your hair and keep it from breaking. It also smells good! One tip with this product is a little goes a long way, don't over do it! It's always easier to add more than to take away when it comes to hair products.

Tip: When it comes to flat ironing hair smaller is better. Most people want to get it over asap and work in chunky sections to achieve this. I don't want to be doing touch ups often, or having wavy roots after all of this. Taking small, thin sections to iron out, may take more time, but the end result looks better and lasts longer.

Hair after flat ironing! It's grown since getting it cut a couple months ago!!
Before I decided I was going to straighten my hair I checked the weather. If it's raining, going to rain, be foggy, a chance of rain, humid--in other words any type of moisture in the air--I'm not straightening my hair. Right after spending all this time on my hair I walk my dog, Scrappy, and of course I get hit with some sprinkles. Funny how that happens o___O
 

As I mentioned before, I had some business to take care of  ^_^'  Dealing with the weather wasn't going to be one of them. I wrapped my hair and put a scarf on. Nice and simple. Chunky earrings, and a tie on the side to dress it up a little and I'm out the door!
 
-_________-        It didn't end up raining after all, but I still looked cute!

This is one of a few ways I've found to keep my hair from being overly dry. 
 
Know of other ways to keep your hair moisturized, conditioned, and/or healthy? Let me know!!