YouTube is a site that I've learned a lot from--both good and bad. It helped me learn how to do flat two strand twists, reconstruct my own t-shirts, make flax seed gel, that there reallyare people in the world who put bacon on everything, the latest dance moves to avoid at all costs, and more! I had no idea how challenging it could be to make my own video for YouTube!! So far I have two made!!! The first was the most difficult, but I made it. Check them out, subscribe to my channel, let me know what you think, and keep your eye out for more!!

Sunday, October 30, 2011
Monday, October 24, 2011
Coconut Oil
My latest venture was making whipped shea butter with coconut oil! I love shea butter, coconut oil, and essential oils, so why not make something great out of all of them? This time around I made sure to take pictures of the process.


What I Used:
- Organic Extra Virgin Coconut Oil
- Carrot Oil
- Vitamin E Oil
- Lemon Essential Oil
~~~~~~~~~~~~~~~~~~~~~~~~~~~~~~
Using a double boiler, on a medium heat I melt the shea butter and coconut oil. About two parts raw unrefined shea butter was used to about one part organic extra virgin coconut oil. It takes a few seconds for it to melt completely. That's fine, because I don't want to cook the oils; I just want them melted.
 |
| Once the majority of the shea butter and coconut oil is melted I turn the heat down to low. Using a plastic knife I gently stirred the remaining chunks until melted. After completely melting, I add in Vitamin E Oil, Olive Oil, and Carrot Oil. It looks like popcorn oil. |
~~~~~~~~~~~~~~~~~~~~~~~~~~~~~~
Next, it's time to cool the oil down to stop the cooking process, and so that it may be whipped! I put the entire pot into the freezer for about 3 minutes. After removing, I use a hand mixer (on a medium setting) to whip the oils together.
 |
| I mixed the oils for about 3 minutes before returning the pot to the freezer. In the beginning you'll notice that the mixture returns to its liquid state. The friction caused by the mixer reheats the oil, so the process of mixing/chilling has to be repeated a few times. |
 |
| Soon you'll see froth on top of the oils. This is caused by the air forced into the oils by the mixer. You want to see this; it's what will make the whipped product light and fluffy. |
~~~~~~~~~~~~~~~~~~~~~~~~~~~~~~
After repeating this process a few times the mixture will start to thicken up.
 |
| At this point you want to start paying extra attention to your mixture. Keep blending, but cut the time in the freezer down so you don't over chill the mix. It'll remind you for a watery pancake batter. If you want a more airy product set the blender speed to high. This will force more air into the oils. |
~~~~~~~~~~~~~~~~~~~~~~~~~~~~~~
Now is when I add in any EO that I plan on using. For this mixture I used about 6 drops of Lemon EO and about 30 drops of Lavender EO before blending. Smell the whipped mix, and if the scent isn't to your liking adjust the number of drops you use.
 |
| When you see a "skin" forming on the top after putting in the freezer you no longer need to chill the mixture. Continue to blend until you reach a consistency that you like. Keep in mind that the mixture will solidify a little more after it completely chills. |
~~~~~~~~~~~~~~~~~~~~~~~~~~~~~~
When the shea butter-coconut oil mixture starts to look like a body butter, or thick lotion I stop blending. This is the consistency I desire. If you keep blending the result will be more airy and solid. Stopping here gives you a creamier product. In the end both ways will melt at body temperature.

~~~~~~~~~~~~~~~~~~~~~~~~~~~~~~
Using my plastic knife I scrape in my whipped shea butter into small glass jars with air tight lids. A piping bag (like bakers use) could be used to help transfer the whipped shea butter into containers.
 |
| As you can probably tell, the results resemble a lotion. The consistency will vary depending on the air temperature. The amount of coconut oil you use will help determine this. If stored in a cool place it'll remain soft, but solid. |
~~~~~~~~~~~~~~~~~~~~~~~~~~~~~~
Pros of this Mix:
- The acid in Lemon EO will help seal the hairs cuticle trapping in moisture
- Lemon EO acts as a clarifier to your hair helping to remove excess product and add shine
- Lavender EO is great for dry, oily, or damaged hair, because it helps normalize natural oil production
- Both Lemon EO and Lavender EO help fight the causes of dandruff.
- Coconut oil melts at about 75 degrees, so your natural body temp helps it spread. Less product needed
- Coconut oil is a natural antimicrobial
- Shea butter and coconut oil are both great hair and skin conditioners
- Shea butter has many healing properties
- Shea butter is quickly absorbed by the skin
- Carrot oil is high in antioxidants that help fight hair loss
- Olive oil helps improve elasticity (how far hair can stretch before breaking) of dry hair
- The whipped mix isn't as thick as raw shea butter, so people who were turned off by that have a new alternative
Uses for this Mix:
- Apply to wet hair after shampooing, and before styling for a leave in conditioner
- Use to protect the ends of your hair if they're damaged
- Massage into the scalp at night
- A hot oil treatment since the mix will liquefy with heat
- Use in a wash n go for extra protection
- Treat heat damaged hair
There are a few samples of my whipped shea butter mixtures floating around out there. Hopefully soon I'll have a couple reviews back on it. Try to create your own mixes. What would you use??
Thursday, October 20, 2011
Whipped Shea Butter
Going to a salon on occasion is great, but once I figure out the routine that's used for my hair, products, etc. I'm off to doing it myself. Doing this saves me money, time, and helps me take care of my hair the best. This applies to finding a great store bought product. I like to research ingredients, the how's and why's, then I'm off to making it, and usually replicating it cheaper. An example of this is my whipped shea butter mix! I absolutely love shea butter. I've used it for years on my skin, my hair, cuts, itchy spots, light burns, etc. Other things I commonly use is Vitamin E oil, olive oil, and lavender essential oil (EO). I know all of the benefits of these, so why not combine them into one great product?!
Alternative Ingredients:
Coconut Oil
Tea Tree Oil
Mango Butter as the base
Coco Butter as the base
Aloe Vera Oil
Cotton Seed Oil
Honey*
Rosemary EO
Soybean Oil
Do you have a recipe for whipped shea butter? What ingredients do you use?
 |
| The final result!!! |
What I Used:
- Unrefined Shea Butter - Great healing and moisturizing properties
- Carrot Oil - Beta carotene helps dry/chapped skin. Great for hot oil treatments, because it helps smooth and strengthen hair
- Vitamin E Oil - Can help prevent scarring, sooth burns, protects against UV rays
- Olive Oil - A deep penetrating moisturizer, natural cell generator, and anti-inflammatory
- Sunflower Oil- Great for mature, damaged, or sensitive skin. It's easily absorbed, and full of omega oil, vitamin A, E and D
- Caster Oil - Rich in fatty acids, a humectant (draws moisture) and natural anti-inflammatory
- Grapeseed Oil - Great for sensitive skin. It's light and good to use as a carrier oil for EO
- Sweet Almond Oil - Skin conditioner that's good for eczema, dry, or itchy skin, and is easily absorbed. It's a good substitute for Olive Oil
- Jojoba Oil - Closely resembles the oil your scalp natural produces. It's actually a non greasy liquid wax.
- Lavender EO- Natural disinfectant of the skin and hair. Helps stimulate blood circulation, and calms the skin
- Ylang Ylang EO- Means "flower of flowers" and is the essence from a flowering cananga tree. Helps normalize sebum (oil) production in the skin, condition hair, and stimulate hair growth.
- Peppermint EO - Contains fatty acids, calcium, vitamin A and C. It stimulates blood circulation, is good for oily skin, and dull hair
~~~~~~~~~~~~~~~~~~~~~~~~~~~~~~
After carefully melting, mixing, cooling, and blending my Whipped Shea Butter was created!! I'm in love with it. I used this after washing my hair, and before putting my hair on flexi rods. This is day 5 and my curls still look fresh, my hair is super soft, shiny, and smells good! I'll continue to make and use this mix. There are so many beneficial ingredients and I'm not limited to just hair use. This whipped shea butter can be used as a skin conditioner also, in place of lotions or creams.
~~~~~~~~~~~~~~~~~~~~~~~~~~~~~~
Pros:
- It's a light weight product. The whipped shea butter melts with body temperature
- The scent is light and it smells great
- A little goes a long way
- It cost less than $10 to make about 1 pound of whipped shea butter
- Multi-functional; can be used on hair and the body
- It's non greasy and is easily absorbed into the skin
Alternative Ingredients:
Coconut Oil
Tea Tree Oil
Mango Butter as the base
Coco Butter as the base
Aloe Vera Oil
Cotton Seed Oil
Honey*
Rosemary EO
Soybean Oil
Do you have a recipe for whipped shea butter? What ingredients do you use?
Wednesday, October 19, 2011
Shea Butter
Shea butter is one of my favorite products to use for my hair and skin. It's definitely something that can always be found in my house. There are so many beneficial qualities and uses for it. Shea butter has natural fatty oils that help seal in moisture, nourish, and protect both your hair and skin.
What is Shea Butter??
Shea butter is actually the fat that's extracted from an edible nut of the shea, or Karite tree. Karite (ka-ree-tay) means, tree of life. It can take 1 tree up to 20 years to mature, and they can live over 200. Fruit from the tree take up to 6 months to ripen. Shea trees are indigenous to countries in central Africa.
Difference between shea and other seed oils??


 |
| Shea nuts |
What is Shea Butter??
Shea butter is actually the fat that's extracted from an edible nut of the shea, or Karite tree. Karite (ka-ree-tay) means, tree of life. It can take 1 tree up to 20 years to mature, and they can live over 200. Fruit from the tree take up to 6 months to ripen. Shea trees are indigenous to countries in central Africa.
 |
| This is typically the way I find shea butter sold locally. |
Difference between refined and unrefined??
Unrefined shea butter is in its most natural state. It hasn't been stripped, or put through any chemical processes. Unrefined shea butter is most beneficial, because it retains all of its vitamins and healing properties. Refined shea butter has been chemically processed to help extract it from the nut, alter the color, texture, or even smell. This process strips shea butter of its vitamins and can leave contaminants behind.
~~~~~~~~~~~~~~~~~~~~
Facts:
- Melts at body temperature and is easily absorbed, so a greasy feeling isn't left behind
- Used in some chocolates as a cocoa butter substitute
- Raw/Unrefined shea butter is best, because there are no contaminants in it such as solvents or preservatives
- A humectant (holds moisture)
- A natural anti-inflammatory
- Absorbs UV rays
- Helps improve wrinkles, eczema, sunburn, stretch marks, mild muscle aches, scars, and other skin ailments
- Full of Vitamin A and E
- Naturally contains a form of latex
- Can range in from a light beige to a yellow color
~~~~~~~~~~~~~~~~~~~~
The main difference is the nonsaponifiable (healing) fraction. This is the proportion of vitamins and nutrients needed for healing properties. An oil or butter can have great moisturizing (saponifiable) properties, but if it provides a low percentage of nutrients or vitamins to the skin the benefits of its use are low. Most seed oils healing fraction is than 1% while shea has 5% to 17% depending on how it's processed. This high healing percentage, along with sheas great moisturizing abilities is what makes it stand apart from other seed oils.
Grades of Shea Butter:
A (cream to grayish yellow in color) - Raw or unrefined; usually extracted using water
B- Refined
C (white in color) - Highly refined; usually extracted with a solvent. Vitamin content starts to lower
D- Lowest uncontaminated grade. Nutrients and the natural scent are almost completely removed
E- Has contaminants. May be used as a moisturizer, but is poor quality for any other benefits


****Color depends on factors such as: the region, age of tree, season, and the type of processing.
Common Products with Shea Butter:
- Skin Moisturizers
- Shaving Creams
- Anti-Itch Creams
- Soap
- Cosmetics
Sunday, October 16, 2011
CLOSED: Hakuna Matata Giveaway
A NATURAL HAIR AFFAIR: HAKUNA MATATA
 |
| Las Vegas!! This is the last year for the Vegas show, so go now before it's gone! |
Hakuna Matata is Swahili for, "there are no worries". That's what I think of when it comes to my hair. I'm pretty laid back and carefree about it. My hair is important to me, but I refuse to let it be me if that makes sense. When I'm styling it, accessorizing it, or just wearing it day to day I don't really have any worries about it. Hakuna Matata fits my personality when it comes to my hair. It doesn't hurt that the Lion King is my all time favorite Disney movie, ^_~" and probably the best Broadway musical I've ever seen!
~~~~~~~~~~~~~~~~~~~~~~~~~~~~~~
 |
Red is my favorite color, and I love wearing fros! |
~~~~~~~~~~~~~~~~~~~~~~~~~~~~~~
I wanted to have a business card made to help spread the word about my blog. Most importantly I wanted it to portray me! I had no clue of how to make one, where to buy one, or anything. Dun dunna duuun, Liz to the rescue!! Liz is a great photographer, and artist that I had the pleasure of meeting. It was so much fun being able to work with her. It was at least 90 degrees, and we were working in a huge warehouse with no air conditioner.
 | |
| Can you tell we were being tortured by the elements doing this??? |
What's your name? Liz Pumphrey
How old are you? 27
Where are you from? I'm originally from a little town called Bandera, the self proclaimed "Cowboy Capital of the World." Yeah it's about an hour outside of San Antonio, Texas. I work hard to hide my southern accent.
What do you do..job, hobbies? My full time job is teaching, but my favorite job is being a professional photographer. Photography is my passion, and I'm fortunate enough to have my own business! I also like to play video games, knit, and spend time with my husband and our dog.
What was your first impression when we met? You can be honest...I won't cry, promise! You were infectiously upbeat and I LOVED it!
How would you describe your hair? I love my hair. It's naturally wavy, but easy to straighten which makes it very versatile. It can also be problematic, because there is so much of it. Sometimes it just wants to hang there instead of having movement, so a good cut is a MUST. Ultimately, I think I have sexy hair....when its not in a pony tail.
What are your thoughts on natural/chemical free hair? Too many girls go for that "dead, frizzy, fried" look and to be honest...its not sexy. At all. I think natural hair is more manageable and attractive than hair that's been destroyed by chemicals. That said, I do dye my hair, but I've educated myself on the best ways to do it without causing damage, and if I have questions then I go see my stylist.
Any must have products? My blow dryer...not that it's a product per say, but it's a necessity. I also keep a bottle of Tony and Guy's Frizz Ease around for days when my hair is really unruly.
Where do you currently get hair tips and ideas from? I Google punky/emo/funky hair and go from there. lol Not that I can do any of the things I want to do with my full time job....Sigh.
Where can you and/or your work be found at online?
Photography Website
Model Website
~~~~~~~~~~~~~~~~~~~~~~~~~~~~~~
No worries, red, and, my love for fros helped inspire the business card (above) Liz designed. So here comes my challenge. If you had to make, or find an image that fit your personality what would it look like? Show me and tell me how it reflects you!!
~~~~~~~~~~~~~~~~~~~~~~~~~~~~~~
In a little more than 2 weeks I'll choose a winner for my very first giveaway!! I'll be giving away a super cute, fancy business card holder. Below you can see the one that I use!

 ~~~~~~~~~~~~~~~~~~~~~~~~~~~~~~
~~~~~~~~~~~~~~~~~~~~~~~~~~~~~~
In a little more than 2 weeks I'll choose a winner for my very first giveaway!! I'll be giving away a super cute, fancy business card holder. Below you can see the one that I use!


*** R U L E S !! ***
- Submit an image that is NOT you, but reflects your personality
- Tell me how it represents you
- In the Subject line, or available space put, "I'm entering @MzDezy Hakuna Matata giveaway"
- Be Creative and have fun!!!
- 18 yrs of age or older to enter please
Want More Entries??
You may enter up to 4 times
Giveaway Closes October 31, 2011 at 11:59 PM
Twist Out Update
As promised here are updates of my twist out. This style originally started as two strand flat twists. I had intended on wearing those over night, then wearing a twist out the following day. When I woke up it was raining, so a hair detour was taken. You can read more about that H E R E!!


I know I've said it a few times, but I'm going to say it again ^_^" I am in love with my hair color!!!! Notice how shiny it is. It's also super soft, and manageable. I blame the henna ^_^" Love it!!

If you noticed, when I had the two strand flat twists in I tucked the ends under before pinning. This gives the ends of my hair more curl when I wear the twist out. It also makes a tighter, shorter curl. I'm on day 3 of my twist out, and over time the curls have loosened.
The right side actually looks longer than the left side right now. My right side has a few curls that are hanging past my shoulder. This is caused by me making the flat twists on the left tighter than the right. The asymmetrical appearance of the curls doesn't bother me. If it's a concern for you, then I'd suggest trying to make the flat twists more uniform initially.
At night I haven't been covering my hair since wearing the twist out. I sleep on a satin pillow case, so my hair doesn't dry out. In the mornings I fluff my hair, and arrange it how I want. Usually some type of hair accessory is added to the from of my head. Above you can see the hair feather I added the first day.
Pros of this Style:
Have you tried this style before? What were your thoughts on it?? Share!

Before taking my twists down I put tea tree oil on the parts in between the twists. Besides a little tea tree oil on my scalp no other products were used.

I know I've said it a few times, but I'm going to say it again ^_^" I am in love with my hair color!!!! Notice how shiny it is. It's also super soft, and manageable. I blame the henna ^_^" Love it!!

If you noticed, when I had the two strand flat twists in I tucked the ends under before pinning. This gives the ends of my hair more curl when I wear the twist out. It also makes a tighter, shorter curl. I'm on day 3 of my twist out, and over time the curls have loosened.
The right side actually looks longer than the left side right now. My right side has a few curls that are hanging past my shoulder. This is caused by me making the flat twists on the left tighter than the right. The asymmetrical appearance of the curls doesn't bother me. If it's a concern for you, then I'd suggest trying to make the flat twists more uniform initially.
At night I haven't been covering my hair since wearing the twist out. I sleep on a satin pillow case, so my hair doesn't dry out. In the mornings I fluff my hair, and arrange it how I want. Usually some type of hair accessory is added to the from of my head. Above you can see the hair feather I added the first day.
Pros of this Style:
- It transforms over the days you wear it. This minimizes the manipulation on your hair.
- The two strand flat twists are a great protective style that can be worn casually, or dressed up with accessories.
- You can achieve curls without harmful heating tools
- This style can be worn on most hair lengths. If you can two strand flat twist your hair you can rock this.
- It's very quick to style. The flat twists took me 10 minutes tops to complete.
- Two strand flat twists can easily be worn in moisture filled environments. Rain, sweat, and humidity aren't an issue.
- It's a great style to wear while working out! It's protected, styled, and out of the way.
Have you tried this style before? What were your thoughts on it?? Share!
Saturday, October 15, 2011
Styling Tool Quickie: Perm Rods
I prefer perm rods over rollers when it comes to curling my hair, especially over night. Hard plastic rollers hurt to sleep in, or they'll have you sleeping in impossible positions to get a half nights rest. Sponge rollers tend to dry my hair out, because they're made out of sponges and draw out moisture. So perm rods are my preferred go to styling tool for curls.
There are many types of perm rods, different colors, sizes, and styles. I bought mine at Sally's Beauty Supply, but they're available at most hair stores. The perm rods came in, I believe, packs of 10 for about $3. Depending on the size you can create tight curls, waves, loose curls, and they can be used on most hair lengths.
Uses for Perm Rods (besides perms):
After styling my hair with perm rods I cover them with a satin bonnet to protect them while sleeping. The longer you keep the perm rods in the tighter the curls will be. If you leave them in for a short amount of time you'll have more of a wave, then a curl. You can sit under a hair drier to speed up the process if desired.
Have you used perm rods for styles other than perms? Share!
Visit H E R E!! to see results of a style I did with perm rods ^_~"
 |
| I use mid-sized (pink) and large (purple) perm rods |
There are many types of perm rods, different colors, sizes, and styles. I bought mine at Sally's Beauty Supply, but they're available at most hair stores. The perm rods came in, I believe, packs of 10 for about $3. Depending on the size you can create tight curls, waves, loose curls, and they can be used on most hair lengths.
 |
| Visit H E R E!! for more detailed info! |
Uses for Perm Rods (besides perms):
- Sets- style as if doing a roller set, sub rollers for perm rods. Great for transitioning hair and TWA!
- Sets- style as if doing a spiral set. Great for curling locs, braids, two strands, etc
- Restyle a protective style such as mini twists
After styling my hair with perm rods I cover them with a satin bonnet to protect them while sleeping. The longer you keep the perm rods in the tighter the curls will be. If you leave them in for a short amount of time you'll have more of a wave, then a curl. You can sit under a hair drier to speed up the process if desired.
Have you used perm rods for styles other than perms? Share!
Visit H E R E!! to see results of a style I did with perm rods ^_~"
Thursday, October 13, 2011
Olive Oil Treatment
Hot oil treatments are one of my favorite things to do to my hair and scalp! They can come in handy in the hot summer time, or during the cold, dry winter. Personally I don't do them more than twice a month, if that often. There are a ton of premixed oil treatments at stores, but you can easily make it with things you probably have at home already. Carrier oils that I like to use for treatments are jojoba, carrot, coconut, tea tree, and olive. To enhance these oils even more I like to add vitamin E oil, vitamin A oil, or even a drop or two of an essential oil (EO) such as lavender. Here's a simple recipe:
~~~~~~~~~~~~~~~~~~~~~~~~~~~~~~
Olive Oil Treatment
1/4 Cup Olive Oil (less if hair is short)
1 Tablespoon Honey
3 Drops of your favorite EO (optional)
*** Mix the ingredients together in a bowl, and then add to damp hair. Make sure to concentrate on your ends. Cover your hair and leave on to condition. If you have a heat cap leave the mixture on for 20 minutes. If you're using a regular shower cap leave the mixture on for 40 minutes. Next rinse your hair well, then continue, and style as usual.
~~~~~~~~~~~~~~~~~~~~~~~~~~~~~~
Benefits of Olive Oil:
- Helps keep the scalp conditioned and moisturized preventing dry scalp and dandruff
- Contains natural fatty acids and can help minimize frizz, dry, or damaged hair
- Adds shine that sulfates (found typical shampoos) strip from your hair
- It's linked to preventing hair loss by stopping production of the hormone DTH
- It's a natural anti-fungal and antibacterial
Benefits of Honey:
- Helps seal in moisture, because it's an humectant (holds water)
- Contains vitamins such as: B1, B2, B6, B5, B3, C
- Trace amounts of iodine, zinc, and copper are found in it
- It's a natural anti-fungal and antibacterial
- Full of antioxidants which help prevent cell damage
** Honey naturally contains trace amounts of hydrogen peroxide, so over time it can lighten your hair. This would depend on how frequent you use honey in your hair, or mixtures.
~~~~~~~~~~~~~~~~~~~~~~~~~~~~~
T I P !!
*** To turn this recipe into a hot oil treatment put the mixture into an empty bottle and let it sit in warm water as you wash your hair. The water will warm the oil before you use it.
~~~~~~~~~~~~~~~~~~~~~~~~~~~~~
This hair olive oil hair treatment is great for anyone who has heat damaged hair, chemically damaged hair, dry scalp, dry hair, dull hair, lifeless hair, and anyone who wants healthier hair! Try it out and let me know your thoughts!! Do you have any hair treatments of your own? Share!!
Wednesday, October 12, 2011
Rainy Day Detour
Before I went to bed last night I planned on wearing a twist out today. I'm a pretty good judge on how my hair will behave when it comes to weather. I checked the forecast before bed, and it said 10% chance of rain. So I just knew that spending 10 minutes putting big flat two strands in would be worth it. Alarm goes off at 7:30am and all I hear is pouring rain O_o
You can probably see where I'm going with this-- no twist out was worn today. BUT my flat two strands are still in tact and look good! I believe it's suppose to rain the next few days, so I'll keep these in for a little while longer.


S I D E N O T E: I LOOOVE my hair color! I definitely plan on sticking with henna. My hair's been super soft and shiny too!
At night I covered my hair with a satin scarf. My skin in general has been on itch mode for the last couple of weeks. Grrr and winters not even here yet!! To help my itchy scalp I put tea tree oil on the parts in between my twists.
To dress up the style a little I added a hair flower (of course) some earrings, and off to work I went. Whenever I do take the twists down they'll be in loose spirals. You can see this style H E R E!! I wore it on my trip to Vegas.
The rain hasn't slowed this style. My protective style has done its job so far. I've been in and out of it today, and my hair still looks the same. I'll post updates later on.
ANNOUNCEMENT: I will be doing my 1st giveaway very soon, so stay tuned, and check back in for info on how to win!!!!!
You can probably see where I'm going with this-- no twist out was worn today. BUT my flat two strands are still in tact and look good! I believe it's suppose to rain the next few days, so I'll keep these in for a little while longer.


At night I covered my hair with a satin scarf. My skin in general has been on itch mode for the last couple of weeks. Grrr and winters not even here yet!! To help my itchy scalp I put tea tree oil on the parts in between my twists.
 |
| I apologize for it being sideways. The computer does not want to cooperate today >_< |
To dress up the style a little I added a hair flower (of course) some earrings, and off to work I went. Whenever I do take the twists down they'll be in loose spirals. You can see this style H E R E!! I wore it on my trip to Vegas.
The rain hasn't slowed this style. My protective style has done its job so far. I've been in and out of it today, and my hair still looks the same. I'll post updates later on.
ANNOUNCEMENT: I will be doing my 1st giveaway very soon, so stay tuned, and check back in for info on how to win!!!!!
Thursday, October 6, 2011
Naturally Meet: Shenicka
Let me start by saying Shenicka is one of the most inspirational people I've ever met! We've been friends for a few years now, but met when she was hired as a work-study student at a former job of mine. We started out working indirectly every once in a while, and ended up being like sisters. If there's ever a time when you need a good word, an ear to talk to, a hug, advice, or a laugh Shenicka is the one! For as long as I've known her, Shenicka hasn't been one to let others opinions decide what's "best for her," or one to give into peer pressure. A great example of this is her over coming obstacles. Speed bumps in the road did not stop her graduating from The Ohio State University with a Bachelors of Social Work, or even continuing on to recently graduated from Case Western Reserve University with her Masters of Science in Social Administration!!! Now that I've told you her life story here's your turn to Naturally Meet Shenicka:

What's your name? Shenicka J.
How old are you? 25
Where are you from? Toledo, OH
How long have you been natural?
I have been natural for almost 26 months (2 years and 2 months). I tried a prior time for 10 months then reverted back to a perm that did not take, so after that experience I decided to try it again, and this time stick to it.
What made or keeps you chemical free? I grew tired of spending my money on chemicals that really didn't work much different from what my natural hair could already do. I realized after a while that my hair was gonna do what it was allowed to do, either way, with or without chemicals, ending at the same result. What keeps me natural is the same mine, but I always remember how stunted my growth was when I used chemicals and how much liberty I feel now as I dare to do things with my hair I either wouldn't do before or couldn't do because of limitation of the chemicals.
What's your favorite style to wear? I love defined curls, so I love washing my hair and putting leave-in conditioner in my hair that helps keep my curls defined, moisturized, and shiny. I also like updo's (photos below).
Do you have any must have products? I am still in search of "the right product" that will work with my grade of natural hair. However, I do enjoy using Garnier Fructis products, and Olive Oil Organic products.
Where do you currently get hair tips and ideas from? Currently, all my friends with the exception of 2-3 are natural, so I usually get tips by word of mouth, via strangers and friends. It's amazing how much someone is willing to share about their process if you would just ask. I do it all the time, because I am always inquiring to learn new things about embracing "my natural".
Are there any words of encouragement, or thoughts you'd like to share? I would like to encourage those ladies who have considered, or are considering joining us naturals to "Just Do It". Don't preoccupy the thoughts of "I want to do it, but I just can't do it...I don't think I can". I use to be that same person who didn't believe they could do it, but I did it and am doing it everyday. I do want to enlighten you that you will go through stages of growth, but once you have reached that peak, you will never look back. It liberates you; it embraces your inner beauty, and defines your profound characteristics. It also gives you a new confidence, because as a woman we all know our hair is very important to us. Once you've mastered embracing your "natural" you will be able to storm any weather. The best thing about being natural is the uniqueness of everyone. No two people are the same, but we all share one thing and that is Liberty. India Arie says it best, "I Am Not My Hair", and neither are you...Be Blessed!
And there it is folks ^_^" Here are some photos that Shenicka provided.


Any questions or comments?? I'd love to hear what you think...leave em below ^_~"

What's your name? Shenicka J.
How old are you? 25
Where are you from? Toledo, OH
How long have you been natural?
I have been natural for almost 26 months (2 years and 2 months). I tried a prior time for 10 months then reverted back to a perm that did not take, so after that experience I decided to try it again, and this time stick to it.
What made or keeps you chemical free? I grew tired of spending my money on chemicals that really didn't work much different from what my natural hair could already do. I realized after a while that my hair was gonna do what it was allowed to do, either way, with or without chemicals, ending at the same result. What keeps me natural is the same mine, but I always remember how stunted my growth was when I used chemicals and how much liberty I feel now as I dare to do things with my hair I either wouldn't do before or couldn't do because of limitation of the chemicals.
What's your favorite style to wear? I love defined curls, so I love washing my hair and putting leave-in conditioner in my hair that helps keep my curls defined, moisturized, and shiny. I also like updo's (photos below).
Do you have any must have products? I am still in search of "the right product" that will work with my grade of natural hair. However, I do enjoy using Garnier Fructis products, and Olive Oil Organic products.
Where do you currently get hair tips and ideas from? Currently, all my friends with the exception of 2-3 are natural, so I usually get tips by word of mouth, via strangers and friends. It's amazing how much someone is willing to share about their process if you would just ask. I do it all the time, because I am always inquiring to learn new things about embracing "my natural".
Are there any words of encouragement, or thoughts you'd like to share? I would like to encourage those ladies who have considered, or are considering joining us naturals to "Just Do It". Don't preoccupy the thoughts of "I want to do it, but I just can't do it...I don't think I can". I use to be that same person who didn't believe they could do it, but I did it and am doing it everyday. I do want to enlighten you that you will go through stages of growth, but once you have reached that peak, you will never look back. It liberates you; it embraces your inner beauty, and defines your profound characteristics. It also gives you a new confidence, because as a woman we all know our hair is very important to us. Once you've mastered embracing your "natural" you will be able to storm any weather. The best thing about being natural is the uniqueness of everyone. No two people are the same, but we all share one thing and that is Liberty. India Arie says it best, "I Am Not My Hair", and neither are you...Be Blessed!
And there it is folks ^_^" Here are some photos that Shenicka provided.

You're still able to straighten, curl, pin, etc. your hair being chemical free!!


Monday, October 3, 2011
Sock Bun Updo
I really like this style. I wore it for my birthday dinner, and one of the parties -- VIRGOS!! This is another style I learned from watching a how-to video by Mrs. PrettyDimples on YouTube. You can find a link to her YouTube channel under my "Links" tab at the top. I've seen people wear a similar style before, but never knew how they did it. It's SO simple, and I'll def try it again.


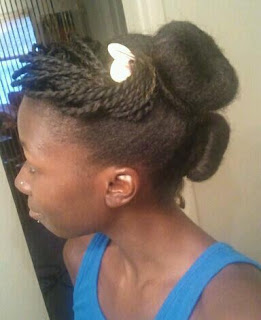

What I used:
- Pair of old ankle socks
- Scissors
- Bobby pins
- Hair ties/ Rubber band
- Shea butter mix


This is a style that anyone can wear. Relaxed, chemical free, long, short--doesn't matter, you can wear this style. You can see two different ways that I wore the buns. One was more simple; I used a decorative hair comb to secure my two strand twists. The second one, bobby pins were used to secure the two strands, but a huge flower was added. You could add chop sticks, feathers, clips, just about anything to change up the style. Try doing three buns instead of two!
Changes I Made:
- If you have dark hair it's better to use a black sock instead of white, or any other color
- A rubber band was easier to cover than a thicker hair tie after making the bun
- Hair ties used should be dark, or close to the hair color. I used brown
- I kept my two strands together, but you could do a twist out for the bangs
- The bun on the bottom was smaller than the top-- Rubber band used on bottom and hair tie used on the top
These are just things that I changed, or noticed while doing this after watching the YouTube video mentioned above.
At night I covered my hair with a satin bonnet after removing bobby pins. This style takes literally 10 mins max to do, so there was a point where I took down the whole thing, and re-styled in the morning. I wore this for about 4 days before moving on ^_^"
Have you done this style before? Know any mods, or variations?? Share!
Variation: Two Strand Twists
I'm not sure why, but I always like to have one side of my hair in the front pulled back. This applies when wearing twist styles too. This style was completely random, and wasn't planned at all. In the winter I like to wear hats, and it's easier if my hairs styled in twists or a similar style. I started by making flat two strand twists on one side of my head. On the opposite side I made regular two strand twists. To get the curls I slept in perm rods over night. This style can last a couple of weeks if you care for it properly. At night I covered my hair with a satin scarf, and perm rods if I wanted more curls.


Flowers, pins, clip, hats, and other fancy accessories can be added to dress up this hair style. Even without pieces added this style is very nice. I like this a lot, I just might try it again very soon ^_^" There was no product used while styling, but it was done on freshly washed hair. It took maybe an hour to complete this.


Flowers, pins, clip, hats, and other fancy accessories can be added to dress up this hair style. Even without pieces added this style is very nice. I like this a lot, I just might try it again very soon ^_^" There was no product used while styling, but it was done on freshly washed hair. It took maybe an hour to complete this.
Protective Style: Senegalese Twists
When I was going through my transition phase I tried to keep my hair braided, or in some type of protective style. My plan was to wear styles like this until my hair was to a length I could work with. Wearing protective styles also help lower the anxiety I was having over transitioning. At the beginning it was extremely hard for me to do my hair since it had two completely different textures. Your hair is prone to breakage during transitioning. The part of your hair where the relaxed meets the chemical free is the weakest. You have to take great care in protecting this area specifically.
Senegalese twists are so beautiful; I love them! Just as their name suggests, they originate in Senegal, Africa. There are a few different variations that I've seen. I had mine hot water curled after they were finished.

Senegalese twists are so beautiful; I love them! Just as their name suggests, they originate in Senegal, Africa. There are a few different variations that I've seen. I had mine hot water curled after they were finished.

I kept these in for a good 6 months at least. You're still able to wash, condition, and style your hair with the twists in. Whenever I felt my scalp needed cleaned I washed the twists. I just concentrating on my scalp with the shampoo to make sure it was cleaned. The remainder of the twists I gently rubbed with shampoo, and made sure to rinse very well. Even though your hair is covered in this style you still need to make sure to keep your hair moisturized. A good leave in conditioner is very important. If your scalp gets dry, or itchy just massage oil such as tea tree into your scalp. Since there are so many twists I wasn't able to put my hair under a satin bonnet at night. Instead I'd pull the twists back in a loose pony tail then tie a satin scarf around my head.
More Style Ideas:
- Pull the twists back into a low sitting bun; add a flower or hair piece for decoration
- Use bobby pins to make a swooping bang and add a colorful headband
- Wear a colorful scarf as a headband
- Make one big French braid out of the twists
Once I removed the Senegalese twists I made sure to deep condition my hair and to use a protein pack. After your hair has been in a style like this you'll notice "a lot" of hair coming out with the twists. You shouldn't be alarmed though. Your head sheds hundreds of hairs a day. Do the math, if your hairs been in twists/braids for a month--that's at least 3000 hairs. If you've been washing and conditioning properly you shouldn't have anything to worry about.
~~~~~~~~~~~~~~~~~~~~~~~~~~~~~~
Pros:
- It's a protective style that's low maintenance
- Not limited to just one style
- Helps ease the stress during transitioning
- Easy styling in the mornings
- Less manipulation on hair
- Don't have to worry about frizz, humidity, rain
Cons:
- Takes at least 6 hours to get done (depending on size) and just as long to remove (recruit a friend to help)
- Can be pricey depending on where you go (may have to pay for service and packs of hair)
~~~~~~~~~~~~~~~~~~~~~~~~~~~~~~
 |
| Scrappy and I!!! |
Over all I liked this style, and in general I love it. Would I get it again-- I'd have to be ready for it; psych myself up. The only turn off for me is the time it takes to get them in and out. This is the sole reason I refuse to do mini twists on my own hair. Even if I watch movies as I do it I'm just not motivated. I honestly don't want to sit for 6 hours while someone else does it let alone me doing them!
I'd recommend Senegalese twists, or any similar protective style to anyone who's teetering on going chemical free. Like I said before, styles like these really made a difference for me. There were plenty of days I was ready to give up and grab that box of relaxer, and be done. I actually gave in twice before sticking to my decision. If I got Senegalese twists done again, I'd probably get them a bigger size than in the pictures.
Variation: Wash n Go
Wash n go's are one of the quickest styles to wear, and I love wearing them in the summer! This one turned out to be a birthday hair style. It really was as simple as hopping in the shower, wetting it down, and done. Before doing the wash n go my hair has straight. A few days prior I went to a salon to have my ends trimmed. Whenever my hair is straight before I do a wash n go the curls turn out differently. It's definitely not a bad thing, but different.
 |
| I have a few of "those" friends ^_^" |
~~~~~~~~~~~~~~~~~~~~~~~~~~~~~~
What I used:
- Bobby Pins
~~~~~~~~~~~~~~~~~~~~~~~~~~~~~~
To style I simply let some curls hang for a bang, then pulled back a section, and then secured with bobby pins.
Subscribe to:
Posts (Atom)